1. Introduction
This blog documents my process for creating a stylized gameplay cycle pack as part of the character animation course. Using a bird rig, I explored design decisions, animation principles, and the technical challenges involved in exporting a final polished product.
2. Foundations of Animation
Discovering Maya & Early Exercises
This was my first time doing animation.
I took the first few weeks very seriously, spending a lot of time completing the workshops. I learned the basics of Maya and the timeline through exercises like recreating poses and animating the bouncing ball. I kept exploring by extending its motion further.
Understanding Overlapping Action and Follow-Through
The pendulum exercise revealed the principles of overlapping action and follow-through, and how they’re ultimately mathematical. I learned how a leading point drives the motion, and how movement values trickle down a joint chain.
Learning Through Trial and Error
Often, I was following the tutorial’s steps, but something would still feel off — and without experience, I couldn’t always identify the problem. We’re so used to seeing things move in real life that even small inaccuracies can stand out, even to an untrained eye.
In the walk cycle workshop, I encountered the same issue. I knew something was wrong, but not what, or how to fix it. Richard helped me troubleshoot — the problem was a foot controller shifting pivot slightly and a subtle imbalance in the center of gravity. Once fixed, the difference was clearly visible.
That taught me that there’s no magic fix — animation is trial and error. You go through a list of possible issues, fix some, and eventually it “magically” works better. So I added to my checklist:
– Interpolation of controllers can distort motion.
– Center of gravity must be carefully maintained in every frame.
3. Exploring Rigs and Early Assignments
Testing the Yu’lon Rig and the Baby Running Problem
For the assignment part I thought about using the Yu’lon rig (by CGTarian Online School), it looks like it is an interesting variant on a normal human rig. I tested it during the running workshop, I followed Richard’s tutorial on running animation but I had a really hard time making it work with that rig. It looked more like some kind of a demon baby (maybe it’s the lack of facial expression also)…. and I realized that maybe he looked too much like a baby and babies don’t really run, at least not like a grown man. Looking back, I should have used a toddler-specific reference instead of the rhino-like character in the tutorial. But it was interesting to test and see the results of using a reference unfitting to a rig, i’m sure it can be an interesting start point to discover novel kinds of character movements and styles.
Switching to the Beta Rig for Running
Anyway i put him aside and made a run animation with a more suitable rig (more similar in proportions to Richard’s rig),Beta (From agora – Character Design: Olivier Désirée (Capi)
Character Artist: Marco Mendoza Rigging: Giuseppe Chisari ).
It was much easier to follow the tutorial, and i had a chance to play with the balance of the character weight and agility, and focus on overlapping action and follow through in its hands and hair
Returning to the Baby Rig for the Walk Cycle
After a short talk with Alex, I decided to return to the Yu’lon rig for the walk cycle, but this time do it the right way — from proper reference through to polish:
Finding references → Annotating in SyncSketch → Blocking → Spline → Feedback loop → Final polish
4. Baby Walk Cycle Process
Reference Gathering and Analysis
I started by finding some references for the baby walk. I put them in sync sketch and started analysing
links:
reference
syncsketch
I look more closely at:
- The timing of the steps
- The way the feet hits the ground
- Hand positioning
- The differences with grown human walk
Blocking and Early Iterations
I started animating with the reference, it was very interesting because the baby that has just learned how to walk doesn’t follow the same rules any experienced walker follows unconsciously like:
– hand positioning (not symmetrical or rhythmical)
– shifting center of gravity
– the way the feet hits the ground
– expected arcs from a walking animation 8 at the hip, the feet arcs etc.
I followed the reference closely for the key poses, the pelvis and chest didn’t twist as much, and the hands were used to balance but not as precisely and meticulously as a grown person, it seems more like a balancing through random trial and error.
At my first blockout the hands were moving a lot and I remembered we said in class that since it’s looping we want to avoid big movements not to reveal the loop.
So I reanimated the arms with more subtle movement and reduced contrast between keyframes.
I think I like this pass, it has the direction and vibe I was looking for the unbalanced awkward toddler walk. For the next pass I need to find the right movement for the head, and refine the timing and spacing.
Applying Feedback and Refinement
Last class I got some feedback from Alex. The main part was to make it last stable so the walk would look a bit more risky, and to smooth out the curves to try and hide the loop. The loop is very visible in the left hand, i think i’ll try to move him more from side to side on the z axis, and the chest and head as follow through to bring it all more to life and adding both action curves and overlapping action and follow through.
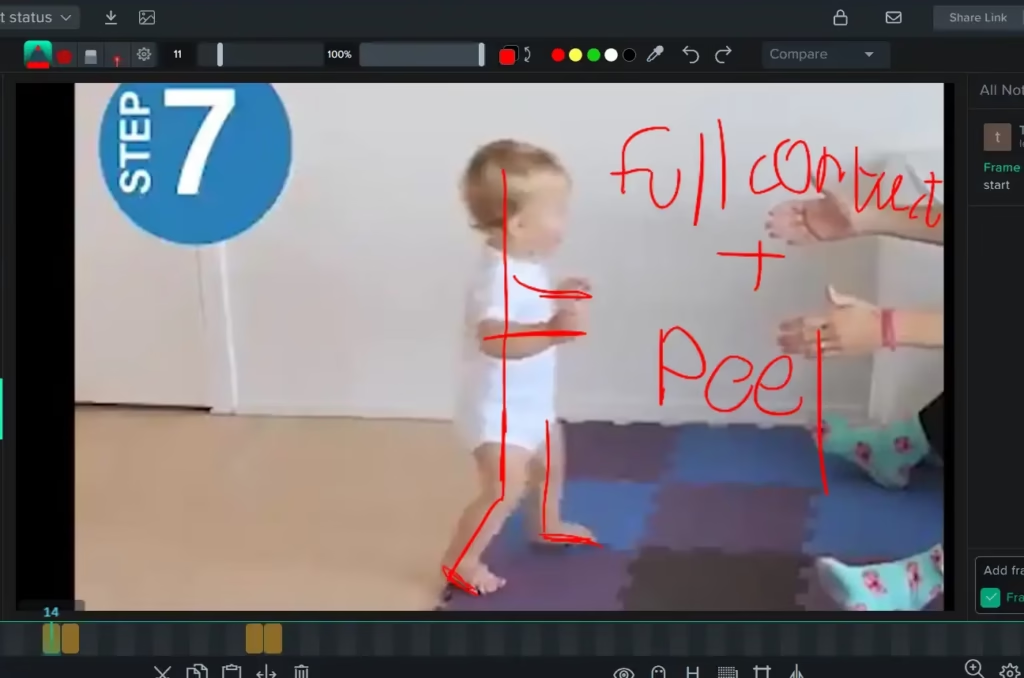
Final Polish and Motion Tweaks
I smoothed out the curves in the Graph Editor and used AnimBot’s motion trail tool to refine arcs. I added a bit more risk in the side-to-side weight transfer and counterbalanced it with subtle motion in the chest and head. I wanted to see how it looked actually moving so for the forward movement, I calculated how far the feet moved on the Z-axis, and offset that motion in the main controller to create clean in-place motion. This wasn’t easy — toddlers don’t walk at a constant speed, and there’s even a tiny pause between steps that you barely notice unless you’re animating it.
In the last two workshop sessions, we were asked to create animations from scratch in class. These gave me a real confidence boost — I realized my workflow and animation thinking were on par with my classmates.
5. Gameplay Pack: Concept and Character
During in-class reviews, I saw Fernando’s idle animation, which inspired me to create a full gameplay cycle pack of my own. I remembered a rig I had been curious about — one that I had already tested for the walk — and realized it could be fun to build an entire set around it.
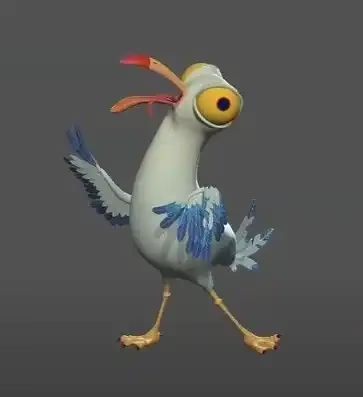
The rig is a stylized, toony seagull. I thought researching its movement would be fun, challenging, and would help define a quirky personality for the character.
Credits:
Zhuhang Ni [Design]
Viktorija Sipilova [Model]
Kamila Bianchi [Rig]
Idle Cycle
First Blocking pass
My first blocking pass felt too busy. An idle animation should feel more seamless and calm, so I planned to separate the motion into two layers:
– A subtle breathing, COG rocking loop on one layer
– A longer, more expressive body shift on another layer
This way I could balance between a clean loopable idle and
occasional, personality-driven motion.
+ Breathing
I added a layer with a breathing loop, around the chest area and in the wings. I also added a slight move in the tail with some of the poses and in the hips rotation.
The stepped mode actually suited the birdy energy. When I moved to spline, I aimed to preserve that crispness by adding copied key poses on either side of holds to control ease-in and ease-out.
Maya Crash & Workflow Interruption
At this stage, Maya began crashing frequently. I spent over a day troubleshooting with ChatGPT and reading crash logs. Eventually, I downgraded to Maya 2024, which helped — but the crashes returned later. I decided to finish the remaining animations on the university computers, which gave me structured, stable work time and helped me stay focused.
Review and Refinement
After sending the idle to Alex, he suggested:
– Slowing down the breathing cycle
– Adding overlap and follow-through in the legs lifting slightly off the ground
– Adjusting the quick head movements
This was the only animation where I used animation layers, which made the file more technically demanding and prone to crashes during export.
Slowing down the breathing (from 30 to 60 frames per cycle) made the idle feel calmer. The added overlap in the legs made them livelier. For the head movement, I couldn’t get it to look snappy enough using just the neck motion. Interestingly, the lack of perfect spacing kept some of the quickness I was looking for — and I think that worked well for the character’s vibe.
Walk Cycle
I found reference footage of a bird walking and annotated it using SyncSketch:
link: Syncsketch
Key observations:
– The body doesn’t move much — it stays fairly rigid as one piece
– The legs rise surprisingly high for such small steps
– The knees bend backwards, and the feet almost touch the body on each step
After completing the blockout, blocking plus, and spline passes (focused mostly on the legs and body), the walk was working well. But I had to decide whether to stick closely to the reference’s neck position or push it toward a more cartoony, expressive version.
Neck Position and head movement
I chose to go with a straighter neck. It felt funnier, gave the bird more awkward charm, and helped define this particular character’s style. It also helped set it apart from a generic bird walk.
As I moved toward polish, I focused on the head. I was inspired by pigeons’ head-bobbing behavior and applied overlapping action and follow-through in the neck and head. This actually came together quite naturally — the timing of the offset made it feel believable right away.
Review and Final Touches
I sent the walk cycle to Alex, and his main note was to add more overlap and follow-through in the feet especially in the toes.
That gave the walk a more floppy, exaggerated quality, which suited the cartoon style much better. It was a great reminder that even small follow-through details in the extremities can totally change the vibe of a walk.
Jump Cycle
Reference and Observations
I found a useful bird jump reference and annotated it in SyncSketch:
link: Syncsketch
What stood out:
– There’s a lot of wing motion for very little airtime
– The feet dangle loosely mid-air
– On landing, the feet come forward before the body does
Maya Crashes Return
Unfortunately, I hit another technical hurdle, Maya kept crashing on my computer. After a long diagnostic process (with the help of ChatGPT), I found it was likely a compatibility bug between Maya and Apple Silicon, especially involving the Graph Editor. Even after I downgraded to Maya 2024, the issue kept returning.At this point, I made the decision to do my animation work on the university computers. In hindsight, I should have reached out to the tutors earlier, but in the end, having structured work hours on campus really helped me stay productive.
To avoid tunnel vision, I decided to work on the Jump and Peck cycles in parallel. This gave me fresh eyes every time I returned to a shot and helped me stay creatively flexible.
Blocking and Stylization
For the jump, I wanted to avoid committing to a fixed height or distance, so game developers could later define that in-engine. The challenge was making it feel stylized while still rooted in natural motion. The real reference wings were large and dynamic, but the rig’s cartoony wings were much smaller — so a literal copy didn’t read well.
I blocked out a version using the real reference, but it felt too flappy and noisy in spline. A mix of not enough spacing and maybe not the right poses. They were faithful to the reference but the reference has bigger wings and the timing and spacing didn’t look good in the animation. I tried to retouch the wing poses to deviate from the reference a bit trying to make it more appealing. I kept one wing with the reference way and one with the new poses. Once I choose one it will be simple to mirror the opposite wing to the chosen one with Animbot mirror left/right.
Review and Reworking the Landing
Alex reviewed the jump and noted that the landing looked like a backwards fall, and the character’s COG didn’t feel connected.
Originally I made him go back in the z axis right before the landing so when the legs touch the floor they will stay in the same character space as when the cycle is over to prevent any need of using the main controller other than for the jump distance and height.
I made a version in which the character stays in the middle the whole time, which means his legs will land in front of him and will have to slide to the center position (so the character starts and finishes on the same spot). I made a version that moved the main controller to compensate on the feet sliding, but it’s a tweak that will make it that much harder to actually use this animation in game…
The feet land in front of a tilted backwards body, so these are the only two options I see…
– Keep the character in the center during the cycle but that made the legs land in front, requiring them to slide backward. Not ideal for a gameplay loop.
– Have the character move back so that the legs land and stay in place more practical for game implementation.
Final Polish
For practical reasons, I prefer the second option. Since its made for a game, this will be easier to manipulate in engine. So I made it that the character moves in an arc towards the back side to prepare for the landing part, making it look less like a big quick change in position and more like a sudden fall.
I also decided on my wing positioning (the stylized one) and mirrored it, and added some overlap and follow through to the toes.
For the final pass, I also added overlapping action in the head during the landing, giving the entire body a responsive, flexible finish.
Peck (Attack) Cycle
Concept and Blocking
While working on the jump cycle, I realized that my original plan for a “dash” animation was looking too similar to the jump, so I wanted to test something else, An attack animation.
I came up with a goofy pecking motion where the bird gets stuck in the ground. This idea felt in line with the exaggerated character I was building and gave me an opportunity to practice using constraints in Maya.
I used AnimBot’s temp control grab function to simulate the peck hitting and sticking into the floor. The concept added both personality and a bit of slapstick, and I knew I’d need to carefully balance the timing since this is a gameplay cycle, it couldn’t be too long.
Spline Pass and Exaggeration
After a solid blocking pass, I moved into spline and tried to push the extreme poses to emphasize the cartoon energy. I made the rig feel stretchy and flexible, especially in the neck and body.
In spline I found that the first try of releasing itself from the ground is not as effective as in stepped and I needed to shorten it a bit anyway, So I tried removing that first little “pull out” moment entirely, and the result was punchier. I also experimented with eye movement: the character doesn’t blink on the first impact, but does blink at the end as a comedic touch. I’m still unsure whether to keep the end blink — it could be scrapped in the final version if it feels too much.
Feedback and Final Adjustments
After sending the cycle to Alex, he gave two main notes:
– Keep the legs planted
– Add a little movement in the beak while it’s in the ground to feel the pull
I implemented both, along with some subtle eye motion to emphasize the comedic timing. These small touches helped reinforce the exaggerated, silly tone I was aiming for — and made the animation feel much more alive.
6. TECHNICAL CHALLENGES AND WORKFLOW SOLUTIONS
Throughout production, I encountered and solved several technical problems that shaped both my workflow and the final quality of the project. These challenges were frustrating at times, but they ultimately pushed me to learn new tools and become more adaptable under pressure.
1. Constraint Loss After Crash Recovery
After a Maya crash during the peck animation, I used AnimBot’s recovery tool to restore most of my scene. However, a parent constraint — originally linking the grabbing controller to the neck — silently broke. Although it still appeared in the Outliner, it no longer worked correctly.
It took a deep inspection of constraint weights to uncover the issue, and in the end, I had to recreate the constraint from scratch. This taught me to always double-check constraint behavior after a crash or recovery session.
2. Layered Animation for Idle Behavior
My idle animation was built using two motion layers:
– A subtle, looping breathing/rocking layer
– A longer, more expressive body shift layer
This separation allowed me to work on background and character-driven motion independently, which was helpful creatively. However, it also made the file heavier and more prone to crashes especially during export. In hindsight, I would simplify the animation structure earlier to reduce instability.
3. Lighting and Viewport Setup for Export
To make my playblasts look clear and consistent, I followed a combination of internal and external guides:
From Richard’s internal tutorial (“Making the Most of Your Playblast”) i learned:
– Avoid ray-traced shadows in the lighting settings — they’re optimized for full renders, not real-time playblasts.
– Set render resolution to 1080p and for the playblast pull from render settings
– Show only polygons in the viewport
– Enable anti-aliasing and ambient occlusion
From Sir Wade Neistadt’s YouTube videos:
Your Animation Playblasts Can Look Like Renders!
Make Your Animations Look Better in 5 Minutes or Less
I learned:
– Use the Light Editor to set up a clean 3-point lighting rig
– Adjust front and back lighting to create readable contrast
– Explore Maya’s real-time lighting options (directional, point, etc.)
I have a background in theater lighting, so this part was especially enjoyable. I treated it like a small stage scene and tried to make the character readable without flattening the details. And I had a lot of fun playing with the lights in the 3D environment.
I enabled Viewport 2.0 features like soft shadows and clean anti-aliasing, and made sure to strip down the scene clutter for each playblast.
4. Playblasting and Master Scene Organization
Rather than exporting and lighting each animation in its original file, I built a master Maya scene for final presentation. Here’s how I handled it:
– I set up the stage, camera, and lighting once
– I exported animation data from each working file using AnimBot
– I referenced the bird rig into the master scene
– I imported the animation onto the rig, one cycle at a time
This workflow allowed me to batch playblast all cycles with consistent viewport settings, lighting, and camera angles. It also made it easier to polish the overall presentation at once, rather than tweaking multiple scenes.
7. Reflection
There are several areas I would improve in a future version of this gameplay cycle pack.
1. Walk Cycle – Less Personality, Less Polish
Out of the four animations, the walk cycle feels the least refined. It’s functional, but I didn’t spend as much time polishing the overlaps or exaggerating the poses. As a result, it doesn’t have the same level of personality or weight as the idle or peck animations.
If I were to revisit it, I’d push the silhouette and rhythm further, and bring more secondary motion to the body and head — while keeping the charm of its awkward movement.
2. Jump Cycle – Missed Opportunity in Wing Mechanics
I think I could have pushed the wing mechanics further. The reference-inspired version didn’t translate well due to the size and style of the rig, but I probably could have made more daring choices in timing, spacing, or stretch/squash to get stronger contrast and impact.
In the final version, the jump works, but it doesn’t pop visually the way I’d hoped.
3. Underestimating the Exporting Phase
I initially underestimated how long the final exporting and playblasting phase would take. Organizing the master scene, dealing with constraint issues, lighting setups, viewport settings, and avoiding crashes — it added up to much more than expected.
In future projects, I’d plan for at least a full day (if not two) just for polishing the scene setup, and exporting.
4. Character Exaggeration and Performance
Overall, I think the tone of the bird character comes across, goofy, awkward, and a bit stubborn, but in a few spots, especially the walk, I held back a little too much.
Next time, I’d like to go bolder with body language and timing. Even small exaggerations can make a huge difference, and the stylized nature of the character invites that level of expression.
Final Thoughts
This project was a huge learning experience, not just in animation principles like follow-through and timing, but in production thinking: planning around crashes, organizing pipelines, managing energy and focus.
Reflecting on the process, I’ve gained a much clearer understanding of what it takes to create polished, gameplay-ready animation, and how much of it comes down to adaptability, troubleshooting, and iteration.
I’m proud of how far I came during this cycle pack. It showed me what I’m capable of, and exactly where I can grow next.
References & Resources
Richard Cunningham, internal tutorial: Making the Most of Your Playblast (Canvas)
Sir Wade Neistadt. Your Animation Playblasts Can Look Like Renders! [YouTube]
Sir Wade Neistadt. Make Your Animations Look Better in 5 Minutes or Less [YouTube]
SyncSketch annotations (linked throughout)
AnimBot official documentation
Maya Documentation: Viewport 2.0 and Lighting tools